Saturday 6 July 2013

Disable Text Selection function in your Blog or Website


Protect your text content disable copy option in your blog. Friends do you have important and unique content and you don’t want someone else copy your blog content don’t worry you have way to protect your content and disable select text option. You just need add below given “JavaScript” in your website or blog for disable text selection function.

Follow below steps for Disable Select text option in blogger blog.

Sign in – in your blogger account

Select your Blog in which blog you want disable text selection option.


Go to Layout Option.


 In Layout option there is an Add Gadget Option Select this (see below demo image)     


After select Add Gadget a popup window will be open (Add Gadget window)

 Now select “HTML/JavaScript” Gadget. (See below demo image)


Now add below given JavaScript in Content Box. (See below demo image) 


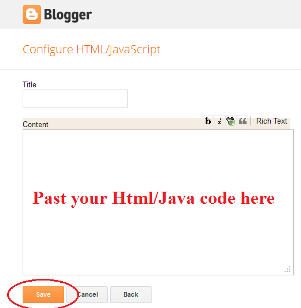
Below is Text Selection Disable Script given (copy and paste) in HTML/JavaScript Content box


Now press Save Button after save press Save Arrangement Button on layout page.

Check your blog now text selection option is disable.

Note:- By Some special Tricks people can copy your content
About Guest Blogger
This post was written by a guest contributor. Please see their details in the post above. If you'd like to guest post for ProBloggingTools check out our Write for PBT page for details about how YOU can share your tips with our community.

How to add css code in blogger


How to add CSS (Cascading Style Sheets) in blogger/Blogspot  blog? Friends some time you want to add CSS code in your blog but you get confuse how to add CSS code in blogger if you are not html user friendly.

So Friends I’m telling you how to add Cascading Style Sheets (CSS) in your blogger by easy way.


You have two ways to add CSS code in blogger.


1st option

Follow below step for add CSS in blogger.

1. Log-in to your blogger Account

2. Select your Blog.

3. Click Template (See below help Image)


4. After 3rd step Click to customize option. (See below help Image)


After click on customize option a new page will be open. (See below demo image which page will be open)


5. Now Click on Advanced button > after this click on Add CSS option now past your CSS code in white text field and finally Click on Apply to Blog button.(See below demo image)


This is 1st option for add CSS Code.

2nd Option

Follow below step for add CSS code in your blogger by 2nd option.


CSS Image


1. Log-in to your blogger Account

2. Select your Blog.

3. Click Template (See below help Image)


4. After this Click to Edit HTML option. (See below help Image)


5. Next Step Now Find below code


]]></b:skin>

6. Now add CSS code before  ]]></b:skin>  tag

See Blow Helping Demo Image where to add CSS code


7. Now save your template you have done it.

How to add css code in blogger


How to add CSS (Cascading Style Sheets) in blogger/Blogspot  blog? Friends some time you want to add CSS code in your blog but you get confuse how to add CSS code in blogger if you are not html user friendly.

So Friends I’m telling you how to add Cascading Style Sheets (CSS) in your blogger by easy way.


You have two ways to add CSS code in blogger.


1st option


Follow below step for add CSS in blogger.

1. Log-in to your blogger Account

2. Select your Blog.

3. Click Template (See below help Image)


4. After 3rd step Click to customize option. (See below help Image)


After click on customize option a new page will be open. (See below demo image which page will be open)


5. Now Click on Advanced button > after this click on Add CSS option now past your CSS code in white text field and finally Click on Apply to Blog button.(See below demo image)


This is 1st option for add CSS Code.

2nd Option

Follow below step for add CSS code in your blogger by 2nd option.


CSS Image


1. Log-in to your blogger Account

2. Select your Blog.

3. Click Template (See below help Image)


4. After this Click to Edit HTML option. (See below help Image)


5. Next Step Now Find below code


]]></b:skin>

6. Now add CSS code before  ]]></b:skin>  tag

See Blow Helping Demo Image where to add CSS code


7. Now save your template you have done it.

How to use custom domain on blogger


Use custom domain in Blogger/blogspot use your our domain name for your blog. Blogger provide us custom domain using facility. If you purchase a domain name through Blogger, there’s no issue in setting it up because Blogger automatically configures CNAME and A-record. And if you purchased a domain name separately, you have to manually configure setting it. In this post I’m going to tell you how to host your own domain name on Blogger/blogspot. 


How to use custom domain in blogger/blogspot?

 You need to buy your website domain name.


Step 1: Adding custom domain on Blogger

1. Log-in to your blogger Account

2. Select your Blog which you want to use with custom domain.

3. Click Setting option >+ Add a custom domain (See below help Image).


After click on Add a custom domain click > Switch to advanced settings. (See below demo image) 

Note:- click on check availability if you want buy a domain name through Google if you want use your already purchase domain follow below steps


Now in the “Advanced settings” enter your new domain name URL with www. (See below demo image for help)


Now when you press save button blogger display this error. We have not been able to verify your authority to this domain. Error 12. (as how in below image)


This error (error 12) shows because we need DNS setting.


Step 2: Change DNS settings

Go to your domain name registrar’s “DNS console” panel and log-in.
Navigate to the “Host Records” click edit.

Add a CNAME.

For Host Name/Name/Label or Host” field, enter “www” without quotes and
For Address/Destination/Target or Points To field, enter “ghs.google.com” without the quotes.

1.Now add another CNAME. This is for domain ownership verification

In the Host Name field, paste the first code you get in step 2.3, ex: 

2. "mzwgquaqmysz ".

3. In the Destination field, paste the second code, ex: “gv-vyecigtdcixwg4.dv.googlehosted.com”.

(Use your own ownership verification codes generated don’t use the two codes above).

Now we should add “A-records”. If you already have “A-records”, modify them. If not, click “Add” button.

You have to add 4 separate “A-records”, pointing to the following Google IP addresses:

216.239.32.21
216.239.34.21
216.239.36.21
216.239.38.21

Enter each IP into an “Address” field. In the corresponding “Host Name” field, enter your domain’s naked URL (without “www”, e.g example.com).
Finally click “Save” button and wait for a few minutes to update all your domain settings.


Update your Blogger settings


Now go back to “Settings > Basic > Publishing” on Blogger and again enter your custom domain name with “www”.

Tick “redirect” option if not tick on redirect box and your visit enter address example.com they will get error and if you tick on redirect box and your visitors enter example.com will be redirect on www.example.com.(see below demo helping image)


Finally click “Save” button. If it again displays “Unable to verify authority…” error, wait for a few hours to update your DNS settings and again add your domain name. No need to follow Host Records modifications. Just add domain name to Blogger publishing section.

That’s it, now your blog has a custom domain name.

Thank I hope you like this post